If you, like me, are a veteran procrastinator with no money and a life-long genetically inherited hatred of large crowds and loud noises, then the holiday season can be particularly trying. Are you tortured by nightmares of crowd-surfing through Kensington Market, trying to find something vaguely original for your self-described “difficult” and “political” older sister? Visions of $75 bathrobes for your mom dancing in your head? Bursting unexpectedly into tears every time you walk past a Winners? Considering just buying everyone a DVD box set of the first season of Friends because I don’t know, whatever?
Fear not. It’s time to crafternate. (Like craft and hibernate? Craftnernate? Does that work? I’m not sure. Anyway.)
A quick trip to a craft supply store and Value Village on the way home from work will have you ready and able to curl up with a hot toddy and a youtube marathon of all 11 seasons of QI while you whittle away (not literally whittle though) (unless you know how to whittle?) (I don’t) (there will be no whittling in this article so if that’s what you’re looking for I’m sorry) at some surprisingly non-shitty homemade Christmas gifts. So, without further ado, 3 crowd-pleasing, cost-effective, last-minute gift DIY.
Last Minute Craft #1: Grown-up Friendship Bracelet!

These are surprisingly easy to make, super pretty, and (bonus!) you get to make one for yourself too. I was lucky enough to get a set of jewelry pliers as a gift from my Sister Who Has A Real Job, but you can make due with most kinds of regular pliers, or even a pair of not-too-sharp nail scissors in a pinch. The following is a basic formula, but you can of course spice it up and switch it around to suit your and/or your giftee’s tastes. You will need:
-
A few eye pins (sounds terrifying, is actually just this)
-
Some small beads
-
Jewellery clasp(s)
-
A few feet of basic necklace chain (depending on how many bracelets you want to make) (make sure the links in the chain are large enough to accommodate your eye pins and clasp!)
-
Felt, or an old, fine-knit sweater
-
two buttons
-
a needle and thread
-
embroidery thread
-
stuffing
You can buy all of these items at most craft stores, or, if you’re feeling particularly scavengy, you can cannibalize cheap-o thrift store jewellery for parts. I usually do a bit of both.
String the beads onto the eye pin, leaving enough space to fold the straight end into a hook with your pliers (this can be pretty tricky if you’re working with really bulky pliers. A good trick is to wrap the end of the pin around something about the same circumference as the loop you want, like the tine of a fork (AND now you know they’re called tines! Scrabble bonus!)). If you have longer pins you can just use one, if you have shorter ones you can hook a few together. Use all one colour or a mish mash of colours or (my favourite) a few slightly different shades of the same colour arranged randomly. Really follow your heart here. Dance in the wind.
Once your eye pins are successfully threaded (not a euphemism for torture; do not torture anyone) cut enough chain to make up the circumference of your giftee’s wrist, after the length of the eye pins. Allow a few millimetres for the length of your clasp as well. If you do not know the circumference of your giftee’s wrist, try to measure it stealthily, with an emphasis on facilitating a series of escalating madcap misunderstandings as a result.
Now you just need to hook everything together! It’s a bit finicky, but pretty self-explanatory. Hook the eye pins onto the chain and the chain onto the clasp, making sure to fully close all the loops so your bracelet doesn’t fall apart. For the sake of simplicity, I like to place the clasp at the end of the chain so that it just hooks directly onto the eye pin, but if you prefer, you can cut your length of chain in half and install the clasp in the middle. If you’re feeling really crafty and a little more folksy, you could forgo the chain altogether and attach a simple twist friendship bracelet to the eye pins and beads. It’s your (friend’s) bracelet! You do you!
Et voila! A cute and thoughtful gift that shouldn’t cost you more than $10 and looks like something you could buy for $40 at Anthropologie!
Last Minute Craft #2: A Mug!
I haven’t actually tried this one yet (hence the lack of picture) but I’ve got big plans and it seems pretty straightforward. You can get special paints and/or pens specially for using on pre-fired ceramics, meaning you can custom paint on any old mug you like, pop it in the oven, and blam-o! A fully customized, dishwasher-safe gift for your mug-loving friend/family member/boyfriend/dog (who knows?)! I got my paints at Curry’s Art Store, but I’d imagine you can find them at most art and/or craft stores. Augment a kitschy Value Village mug with some sassy additions (cartoon kitten with new and improved mustache? Hello!), write an inside joke on a plain mug, or anything you can think of in between. Then just stuff it with your pal’s favourite tea or coffee or whiskey or soup mix (NOT OPTIONAL, NEVER GIFT AN EMPTY MUG) and you’re good to go!
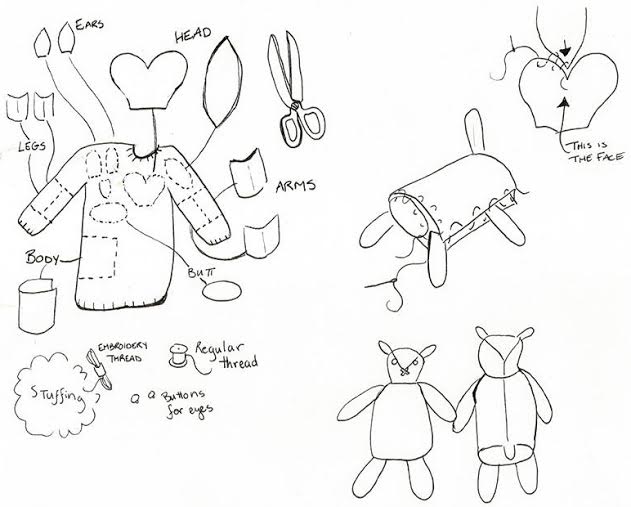
Last Minute Craft #3: Squishy Softy Sheep Snuggly! (by Annalee Kornelsen)

For the little one and/or sheep enthusiast on your list! You will need:
First, shrink your sweater. If you’re like me, you have probably already done this, by accident. This will felt the wool and keep it from unraveling as you sew.
Next, cut out your pieces. I always try and use existing shapes and seams to minimize the actual sewing I have to do. You can just cut off a whole sleeve for the body. Cut out the arms and legs as squares and fold them into rectangles (which you will sew into cylinders).
Make all the limbs and the head. The side of the fabric that you want on the outside should be on the inside (we will turn everything inside out after stitching so the seam is invisible). Two seams on the arms and legs, leaving one end open. When sewing the middle piece into the head, add the ears in between the two pieces, one on either side. They should be pointing in when you are stitching otherwise your sheep will have ears growing into it’s brain. This means you are sewing through three layers of fabric at once. Remember this technique.
Stuff the limbs and head.
Sew the butt onto one end of the body (with your out-side facing in). Half way around put the open end of the leg between the body fabric and the butt fabric with the rest of the leg facing in (same as you did with the ears). Repeat with the second leg a little farther down, and the arms at the top. Leave an opening where the neck should be so you can pull the whole thing right side out.
Turn right side out, and stuff the body. Attach the head and close the hole at the top in one fell swoop.
Add the button eyes, embroider a nose, whatever you like. And, you’re done!
So there you go! Don’t forget to clean up your Craftermath (TRADEMARK) once you’re done – you can call that your Christmas gift to your roommates, YA SCROOGE. Just kidding, you’re wonderful. Merry Craftsmas and a Happy Crafts Year!

