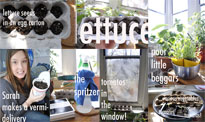
Thanks to the starter kit that was the loot bag of our Fresh City Farms party, I’ve got tomatoes, squash, peppers and a variety of other mystery plants on the grow. A late-night trip to Metro brought a packet of lettuce seeds home, and these were promptly added to an egg carton full of soil and placed in the window. I picked up an apple mint plant and a lavender plant on my way home from school one day, from a real treat of a woman at the K & P Milk & Things on the corner of College and Euclid, for whom a garden became a place of healing with the loss of her husband. She describes her stock of tiny succulents outside her shop as “soooo cute!” and she’s right. She’s always ready with a tip for the novice gardener, so if you’re in the area, stop in and ask away. She also grows aloe, among others, in the rafters of her store. Look up!
Want to start your own container garden? It’s easy! Here are a few basic tips, which I gleaned from an “off-the-cuff” approach to container gardening. In other words, I’m living off the fat-o-the-land. I put some soil from my parents’ garden in a plastic bags and smuggled it to the city on the GOtrain. Add containers. Fast forward to now.
Step 1 – Containers
Anything with good drainage will do. Gather an array of containers that suit your environs (terra cotta planters are classics, and available at most hardware stores, but you can get really creative with this – rogue bathtubs spring to mind…). Egg cartons seem to be a trend when sprouting seeds, probably because of their ready availability, but also because they are so effective. They’re ideal for seeds, as they separate each little plant, plus the cardboard soaks up water really well. Pop an egg carton in another container (like a pie plate) and fill that container with water. Make sure to keep an eye on the water level, particularly as the sun is setting – the container should be dry when the plants aren’t photosynthesizing (science class comes back for a big win!!), i.e. when the sun is out.
Step 2 – Plants!
Pick out what you know you’ll love to eat, what you’ll love to watch grow, what you’ll love to share with others later. Lavender has a very lovely scent (which can sometimes help one fall asleep), you could grow a whole bunch and dry it in the fall to make sachets, baked goods, etc. Tomatoes reach maturity in August, when you can stock up on salsas and other tomato reserves. Basil is an excellent accompaniment to tomato. Lemonbalm is excellent in teas, and according to one particular shop owner on College St (not at the K&P – the wisdom is endless), “cures any sickness, body or mind.” When you’re choosing plants, find out how they take their sun (partial, full, etc) and co-ordinate your placement of the plants around your home with this in mind.
A big part of gardening is loving your garden; you will yield innumerable rewards from it – and not just lettuce. At the Urban Cottage (a.k.a my apartment) we talk to our plants, rub their leaves when they feel glum, are attuned to their needs. This morning the apple mint was looking pretty droopy, my Grandma would call it a “poor little beggar,” which is what sprang to mind at first sight. After testing the soil (dry as a bone) and adjusting its living situation (water!!!) she’s looking as perky as Elle Woods. Oh, that’s another thing.
Step 3 – Names
We name our plants. Naming something attaches it to you, and it’s so much (more) fun (than having a sunroom full of children and naming them).
Step 4 – Soil
Before the actual soil part, focus on drainage. The best plants have the best foundations. Anything that lets water drip slowly through the soil of your container is what you’re looking to line the bottom of your container with. Egg cartons, cardboard, yesterday’s Globe, just give your soil a little room to breathe, and keep it biodegradable. Source your soil from anywhere. Your parents’ yard, a local park, a store where you actually buy it – it doesn’t matter. If you’re potting plants which have already had a chance to grow, they will bring a little bit of their past with them, and come with their own soil in their little container. Plants like these are an excellent supplement to produce and herbs, and will take care of nurturing the soil while the other little guys sprout (and only need a little soil, which is also available at hardware/garden stores). By rotating various plants through the same container of soil, each plant will give and take what it can, thereby enriching the quality of the soil.
Ever wonder what will happen if you plant an avocado pit in soil? I’m waiting to see myself! To sprout your own avocado growth, simply score (cut a shallow x into) the base of the pit, insert three toothpicks around the middle, and place in a full glass of water in full sunlight. Soon the seed will take root and when you’ve got more than a few inches you can put the little guy in some soil and soon you’ll have an absurd growth that will never bear fruit. This last bit was news to me after thinking I was growing an avocado tree for the past year, but you live, you learn. Now I’ve got amazing soil, a pretty neat-looking plant, and the seed was free with purchase of avocado (plus avocado toast, God’s gift to humans with toast).
Step 5 – GROW!
Plants require patience. Whether you’ve got it or not. They also do not respond to worry or fretting, so you can save the dramatics for your next crush. To test soil, an excellent rule of thumb is to lightly press your fingers into it – if any sticks, your soil is moist enough. It your fingers are clean, that soil needs water. This statement has varying degrees of validity with different plants, but you can also tell a lot just from looking at soil. Do your own research for further information, and keep a log!
One of the most important things is not to overwater. Soupy soil is not good soil, and any water you give plants directly from a watering can (or mason jar, or yoghurt tub, or or or) should be soaked up almost straight away. Stop watering if you see puddles forming. Plants love to take their water with sunlight, so keep that in mind when you’re watering. Just like humanfolk, plants like to have their pillows fluffed. I keep a spoon in my big planter, and this works just fine for a little soil churning every now and again.
Keep a garden spritzer on hand – you can pick these up at any good hardware store, or drugstore for that matter. In fact, if you washed out your windex bottle next time you finished one off (ten points for you and your domestic godliness!) you could fill that baby up. Spritzing plants with water mimics rainfall, and they love it. If you’ll be around for the day, keep spritzing. If your family/roommates will be around, enlist them. If not, live and let live. The plants understand.
Step 6 – REAP
There’s the old adage you reap what you sow – it sometimes rings true most simplistically with gardening. Let your leafy greens, succulents and vines grow into your heart and your living space while your vegetables take seed and bloom into meals. Plants prefer to be outside (and so do humans, if you want my opinion), especially with those lovely bees out and about doing their thing with pollen, but they can be okay inside, too. But besides the obvious fruits of your labour, there is enjoyment to be had in co-existing with botany. Take your morning coffee in your homegrown oasis, hash out an essay under their canopy, craft your herbs into centrepieces for your next soiree. Gardens are such a treat!
Enjoy your oases. Talk to your stalks. Love your leaves. Find joy in the buds. Send me pictures. Good luck! And stay tuned for vermiculture – yep, worms and compost. My roommates are already squirming (along with the red wigglers we picked up from the worm hotel on Bloor my friend and co-gardener Sarah (pictured with said vermi) found on the internet…).
~ Annie Webber

