by Rina Grosman
Hello again! I realize that I didn’t introduce myself in the first column so here’s a little bit about me: I’m an arts educated lass who’s been told numerous times that there has to be an 80 year old grandmother stuck in my body. I teach sewing and crafting to all ages and do freelance (people ask you to do the most random and weird projects). I love going shopping just for inspiration and a lot of times find myself exclaiming at a $400 belt “I can do that"!

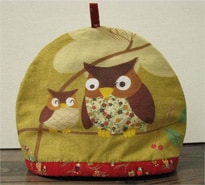
Hopefully some of you reading this feel a similar pride when you’ve made something yourself, especially when asked: “where did you get that gorgeous ____"? I’ll be updating the column once a week with new projects and if anyone ever has suggestions for a craft or questions please feel free to contact me, or the site. So without further delay here’s this week’s project: Following the lead of the Bitchen Kitchen column, this craft is also tea party related. I am absolutely addicted to tea and tea paraphernalia, which means that I am also totally addicted to tea related crafts! So let’s start off the tea trend with something your grandma would be proud of!
Materials:
Fabric Paper Ribbon (optional)
Solaris fabric Ruler
Lining (broadcloth) Fabric chalk
Thread Pencil
Measuring tape Scissors
Note: Solaris is an insulating fabric, which keeps heat in. It’s available at Fabricland and probably other fabric stores as well. It has a shiny silver side and a white fabric side. The metallic side needs to be nearest to the heat source.
Step one: Measure your teapot from handle to spout and from top to bottom. Add an inch to both measurements so that the cozy will easily fit over your pot. On a piece of paper plot the length and width measurements (make sure they intersect at 90 degrees). Draw a curve that connects your length and width markings (this will create the shape of the cozy). Cut out your new pattern.
Step two: Fold your fabric in half (right sides together) and place the pattern onto the fabric, pin. Trace around the pattern with fabric chalk and then mark another line 5/8” away from your drawing (this is your seam allowance). Cut out the fabric on the 5/8” line. Trace the same pattern onto your Solaris and lining fabric, but don’t add a seam allowance, cut on the line.
Step three: Pin your fabric right side together. If you want a tab at the top: fold ribbon in half and place it in the centre top of the cozy (the folded part touching the right side of the fabric). The ends of the ribbon should be poking out the top of the pinned fabric. Place the lining right sides together and then sandwich them with the Solaris (shiny side against the lining and fabric side facing out), pin.
Step four: Sew fabric with a 5/8” seam allowance all the way around, trim. Sew solaris and lining with a 1/4” seam allowance, trim. Turn fabric right side out and iron. Place solaris and lining inside of the fabric and trim bottom if uneven.
Step five: Baste bottoms together to keep from moving. Cut a strip of fabric (matching cozy or lining fabric) 4” wide and a little longer than the circumference of the cozy. Double fold the strip so that all of the raw edges are hidden and the fabric measures 1” (like double fold bias tape). Fold around bottom edge of cozy so that half is on the right side and half is on the inside, pin. To finish ends of edging strip fold one end over the other (make sure that raw edges are tucked in).
Step six: Edge stitch approximately 1/4” away from where the strip meets the fabric. Sew all around making sure to catch the strip on the inside of the cozy at the same time as you sew the outside. Iron and admire!

