by Rina Grosman
Things have been so busy lately with the One of a Kind Show and Loreal Fashion Week that it seems like I’ve been going to see and be inspired by creative and crafty things rather than actually making them! Another thing that I’ve been doing is putting together a portfolio…ugh. One of those things you always will say you have to do, but never actually get around doing until it’s crunch time. So in order to take decent pictures of my projects I a) enlisted the help of a photographer friend and b) built a LIGHT BOX. Of course there had to be a project involved in this operation.
Materials:
Foam core (at least 2 pieces) White smooth paper
Velum, or double frosted milar
Glue (contact cement or something strong)
Pins
Exacto knife, cutting mat, ruler, pencil
Step1: Mark eight 4” wide rectangles (using the length of the foam core sheet). Cut using the exacto knife (much cleaner than scissor) Mark and cut eight 4” strips using the width of the foam core.
Step 2: Apply a very thin layer of contact cement to the ends of the shorter foam core pieces. Do the same to where they will connect to the longer sides (4” at either end). Let glue air dry for fifteen minutes. Attach glued surfaces together.
Step 3: Attach the rectangles together (forming a box) by pushing long pins through the foam at joining points. I wanted to be able to take this box apart for easy storage, however you can permanently glue the rectangles together with contact cement if you like.
Step 4: Attach velum on two facing openings of box with either pins (for easy removal), tape, or glue. Attach smooth paper (backdrop) from the top of one opening (using one of the attachment options) so that it curves and covers the bottom of the box as well.
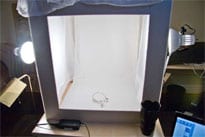
Step 5: Turn off the room lights and set up one light on either side of the box and the camera in front of the remaining opening. The top of the box can also be covered with paper or fabric.


