by Dilys Tong
This skirt is a crazy easy to construct and is so versatile that it’s a great addition to anyone’s wardrobe. Perfect for beginner sewers or for those who wants to have a new skirt in a couple of hours ready for the night out! Sass it up with a beaded fabric, go for the casual look with a light weight cotton or with a classic wool gabardine for the fall, the possibilities are endless!
You will need….
-
A sewing machine (of course)
-
1 ½ yard of fabric (the longer your skirt, the more fabric you will need)
-
Basic sewing tools – straight pins, threads, cutting sear
-
½” wide elastic=
Making the pattern……
-
You will need your hip measurement + ½” ease. We will use my hip measurement as the example
My hip measurement is 38” + ½” = 38 ½”
-
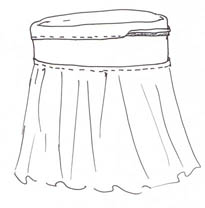
Yoke – the length of the yoke is your hip measurement + ease. The width can be anywhere between 3 to 5” wide. That is up to you.

-
Skirt – Since it’s going to be gathered to fit the yoke, the skirt needs to 2 times your hip measurement plus ease. For example 38 ½” * 2 = 77”. We will divided that in half. The width of the front and back skirt will be 38 ½” by 18” long.

-
Add seam allowance for all seams. Suggest to use 5/8”
Construction: ( seam allowance is 5/8” or whatever the seam allowance you chosen)
Yoke – cut 1
Skirt – cut 2
Step 1: Yoke – With the right side together, matching side seam and stitch.
Finish the seam edges either by serging or zigzag.

Step 2: Skirt – with the right side facing together, stitch front to back together at side seams.

Step 3: Skirt – Gather the upper edge of the front and back. (To make gathering stitch – use largest stitch length and do not back stitch. Stitch one row at your seam allowance and the second row within the seam allowance. Pull the thread and you should see the gathering happens!)

Step 4: With the right side together, pin the yoke and the upper edge of the skirt together. Pull the gathering stitch gently until the skirt upper edge matches the yoke edge. Stitch. Serge or zig zag to finish the seam. Don’t forget to press the seam.

Step 5: Elastic casing – First, we press the upper edge of the yoke to the inside by ¼”, then press the folded edge to the inside by 5/8”. Stitch it down and make sure to leave an opening to feed the elastic through.

Step 6: cut the elastic to a measurement that is comfortable. Insert it through the casing. Once the elastic is completely through the casing, overlap the ends and secure it really well with stitching. Close up the casing opening.
Step 7: Hem – Once you determine how long or short you want your skirt to be, make a narrow hem by folding up the lower raw edge twice by ¼”.
You are finished!

