By Dilys Tong
Sew Be It Studio
www.sewbeitstudio.com
Let’s face it, weddings can be mighty expensive!
Wedding dress…$1500.00.
Invitations…$550.00
Cake…$800.00
Can you feel your blood pressure rising as you go down the list of costs? Take a deep breathe and keep reading because there are LOTS of ways to save some cash by doing it yourself. Among these – wedding veils – these are fun, quick, and easy enough for most brides to do themselves!
Here are two different styles of wedding headpieces for the bride to choose from.
Traditional wedding veil
You will need…
- 1M of 60” wide white tulle. (If you want the veil to be longer, use 2M)
- Sewing machine *
- Hand sewing needles
- White thread
- Head band – try to go for wire hand band or cloth ones.
- 5 M of trim – use narrow trim, nothing too wide as it will be difficult to go around the curved edge.
* If you don’t have a sewing machine, you can do the stitching by hand. It will just take a little bit longer.

Pattern:
- Draw a rectangle 15” wide by 34” long. Extend out from the two long edges about 6”.
- Curve out the two corners.
See diagram 1 – this pattern is made for a veil that finishes just below the tailbone. If you want floor length, use a longer length.
Cutting:
- Cut 2
- You might want to make one of the layers 1 ½” shorter.
Construction:
Step 1: stitch the trim to the outside edge of the tulle. To make it easier to sew, lay the trim ¼” away from the edge, stitch. You can trim off the tulle afterward; this will give you a much nicer finish (Diagram 2).
Repeat this step for the other layer of tulle.
Step2: lay the shorter layer of the tulle on top of the longer layer. Line up the top edge and make a gathering stitch along the edge. A Gathering stitch is basically two rows of a long machine basting stitch running parallel to each other. It allows you to pull the thread and thus create a gather. Make sure you do not back stitch at the beginning and at the end. (Diagram 3)
Step 3: Pull the thread end and gather the top edge to 6” (Diagram 4)
Step 4: Secure the gathering by knotting the lose thread ends.
Step 5: Secure the veil to the head band. (Diagram 5)
Also, if you want to add a little extra sparkle to your veil, you can sew some small delicate gems or beads onto it. If you are careful, you could even just glue them on.
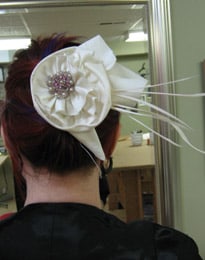
For the non traditional bride – A sassy headpiece
Super easy and super sassy! What more could a busy bride ask for?!
You will need:
- ½ M of fabric – any color of your choice, use fabrics that are not too soft and flimsy. Something that has a some weight, such as Shantung silk, dupioni silk, or bridal satin.
- Feather of your choice – Aim for simple and elegant. You do not want to look like you have a dead bird on top of your head.
- Clear plastic hair comb
- ½ M of ¼” wide white ribbon
- Sewing machine
- Hand sewing needle
- Thread
- Glue gun
- Jeweled or beaded brooch – new or antique

Cutting:
- Cut 2 bias strips of 23” long by 1 ½” wide. Bias means you should cut your strip on a 45 degree angle on the fabric. (See diagram a)
- Cut 1 bias strip of 2 ½” long by 16” long.
- Cut a triangle shape 9” base and height 10 ½”. (diagram b)
Construction:
Step 1: Make the circular flower shape
- Make a gather stitch along the edge of the two 1 ½” wide bias strips. (diagram c)
- Pull the thread till it gathers into a circular shape. (diagram d)
- See gather stitch instruction in the traditional veil step 2
Step 2: Make the third larger flower
- Fold the fabric strip in half with the wrong sides facing each other, make a gathering stitch along the cut edge. Make sure you stitch the two layers together.
- Same as above step, pull the thread until it gathers into a circular shape.
Step 3: Stack the three flowers on top of one another, of course with the larger one on the bottom, hand stitch this together.
Step 4: Use the hot glue gun to secure the brooch in the center of the flower.
Step 5: Making the base of the piece
- Take the triangle piece – fold the triangle as in diagram e
- Fold the narrower point up as in diagram f
Step 6: Secure your feather to the base
- Place your feather however you like it
- Secure the placement with hot glue or hand stitching (diagram g)
Step 7: Attach the flower part to the base
- Place the flower part on top of the base, leaving the two pointy tips visible.
- Secure the placement with hot glue (diagram h)
- Trim off any unwanted part of the feather
The main part of the head piece is done for now, time for the comb.
Step 8: Cover the comb edge with the white ribbon.
- Dab a little of the hot glue at the end of the comb edge where you will place the ribbon tip.
- Wrap the ribbon around tightly. (diagram i)
- Secure the end with some hot glue
Finishing:
- Glue the comb to the back of the piece. (diagram j)
Congratulations, you are done! You just saved enough money to buy yourself a nice bottle of champagne! Bottoms up!

